Showing posts with label recycled. Show all posts

Friday, 25 January 2013

A Notebook Makeover

Recently it has been difficult for the two of us to keep up to date with regular blogging, what with Christmas and the start of a new Uni term, so we have come up with a plan of action in order to post more often with our new and exciting crafts. In order to keep organised we have resorted to keeping little notebooks for jotting down ideas, planning posts and developing ideas for later in the year. I (A) got my notebook from Paperchase for £1.50 and it is the perfect size to keep in my bag for recording those ideas that magically appear when I am on the go. However, after a few weeks of carrying it around with me, I decided that I didn't like the navy blue binding and wanted to make it more personal to me. I had recently invested in some fabric tape from The Makery which was perfect for decorating my notebook.


I cut three strips of the tape (as it was not wide enough to cover all of the blue binding in two strips) and stuck them on. It was so quick and easy and I really love the result!


I look forward to crafting more with tapes as they are such an easy and fun medium! 

Tuesday, 13 November 2012

Another Sketchbook


As the second part of the sketchbook project, we were asked to create an 'artist's book' for display, so I created a mini version of my initial sketchbook  using brown paper, carrier bags, envelopes, tissue paper and wallpaper. I like how this sketchbook is pocket-size! It's adorable!

Sunday, 11 November 2012

Life Lately - A Handmade Sketchbook

I am a little over six weeks into my BA Hons Creative Arts (Art/Mixed Media Textiles) degree course at Bath Spa University and wanted to share with you the first of my projects for the textiles half. This was to create a sketchbook from recycled paper and unusual materials such as paper bags and envelopes. I loved this project, and really enjoy working in my new book. I hope you like it too!


The pages are made from carrier bags, amazon packaging, envelopes, tissue paper and wrapping paper.


I decorated some of the pages with paper-doily stencils and made others from old book pages.


I worked from the exhibits in the Bath Fashion Museum, inspired by this vintage postcard. 


I have been experimenting with knitting carrier bags and weaving.

I love my book and can't wait to keep working in it! 
Has anyone else experimented with books?

Sunday, 28 October 2012

A Morning at the Market

We can only apologise for how quiet we have been recently! In late September I (A) moved to Bath, Somerset to begin a degree at Bath School of Art an Design, and since then we have both been getting used to being apart and, in my case, living alone in an unusual city. However, It seems as though this has been successful and I have completely fallen in love with Bath. It is beautiful and there is always something to see, whether it be street music, art of the unconventional fashions of the art school students! I will continue to post about my adventures in Bath, and the crafts that I do, over the next few weeks so there will be lots more to see!

Today's adventures involved a trip to Green Park Station's Vintage and Antiques Market, which falls on the last sunday of every month. I had been desperate to go since I moved to Bath, and seeing as it is only just down the road from me it was the perfect activity for an overcast autumn day. I did not get the chance to take too many photos as I was scouting for vintage lace for my textiles project, however I did manage to take a few...


1. I ran into this well-dressed gentleman - a reminder that halloween is just around the corner!
2. Always a fan of typewriters, I spotted this brilliant shiny-silver one!
3. Teacups, hundreds and hundreds of them! It was like one huge, beautiful tea party!
4. I loved this simple but beautiful stencilled lace letter holder! I really want to have a go at this.
5. I had to give in and buy this stunning little brooch - only £5! Bargain! I can't wait to wear it on one of my heavy autumn jumpers!

As my project is on vintage lace and fabrics, I was determined to find some at the market and I did however they look too pretty to use!


The Green Park Station Market is brilliant! I recommend it to anyone who is in the area. There is so much to see and do! It's fantastic!

Monday, 30 July 2012

Beads? Wire? Ribbon?.....Necklace!!


This necklace is a firm favourite in my rather large (!) and varied collection.....ironic since it cost me almost nothing being made from old beads donated years ago by a good friend, beading wire and a ribbon scrap.

I made around 20 wire loops of around 20 beads per loop (although this would depend on your personal necklace length preference and the size if bead you wish to use) and interlinked them as I made each one. Several of the loops were made up of more than one colour too. One I had achieved the required necklace length, I sewed on a scrap of ribbon for around the back of the neck but this would also look pretty with two ribbons tied in a bow!

Fabulous Flowers!

These beautiful flower brooches are made from strips taken from an old jumper.....hard to believe, I know!

First, cut a strip approx 2cm wide x 12cm long. Fold in half lengthways with right sides together then roll from narrow end to narrow end to form the centre of the flower. Secure by pushing a threaded needle right through the roll, then finish off. The folded edge of the roll will be the right side of your flower.

To make the petals, cut another strip approx 2cm wide x 23cm long. Fold in half lengthways with right sides together. Make a loop of the strip, place over your completed flower centre and join with a couple of stitches. Then push needle right through centre and then through the centre of the loop on the opposite side effectively making two new loops around the flower centre. Push the needle through the flower centre and through the centre of first one loop then the other, effectively creating four loops. Continue in this way until you have your required number of loops/petals.

Once finished, sew a pin to the back. I also sewed a sprinkling of seed beads to the centre to add a bit of sparkle!

Thursday, 26 July 2012

Jubilee Guards Egg-Cup Pin-Cushion


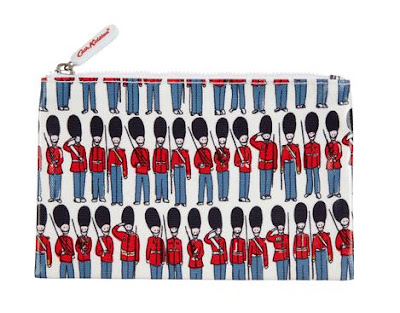
Around the time of the Queen's Diamond Jubilee, we painted a series of pottery items with images of Guards in true British style. We are obsessed with the red, white and blue colour-scheme and the fantastic bus, guard and taxi iconography. With this in mind, we took inspiration from the guards range by Cath Kidston but put our own spin on them.
Photo: Cath Kidston 

The problem with our pottery was that we just didn't want to use them and spoil them so, instead, we had to come up with other ways to use them. Whilst browsing on one of our favourite websites, The Makery Online, we came across this adorable, homemade guards egg-cup pin-cushion.
We fell completely in love and it was decided, that we would make our egg-cup into a pin cushion too! It was really simple, we just covered some toy-stuffing with red fabric then glued it into the egg cup. We love it!

Tuesday, 17 April 2012

Old Jumper?? New Necklace!

It may have a few moth holes or be beyond patching on the elbows but instead of throwing away that favourite old jumper, how about making it into a 'new' necklace?!

We made ours solely from the jumper arms and it is incredibly simple if a little time consuming until you get into the swing of making the beads - strips 1.5cm wide and 16cm long (obviously different widths and lengths of strips will make different sized beads), rolled up then sewn down the seam and across the top and bottom pulling the sides together until a neat ball/bead shape is achieved!

When you have your desired number of beads for your length of neclace, join them together with colour matched embroidery thread. Gorgeous!

Monday, 16 April 2012

Carnival Two-Tier Bunting Necklace


After recieving a copy of 'State of Craft' by Victoria Woodcock, we were imediately inspired by the bunting necklace, a guest submission by Lucie Ellen. Lucie suggests using MDF or plywood to create the triangles however we used high-density PVC (plastic) as it was easier to cut and drill through. Most important of all though, it's free if you recycle plastic from around your house! To decorate our triangles we cut floral patterns from magazines and scraps of intricate floral fabrics which we PVA glued on then sealed with clear nail varnish. Although Lucie often sticks to block colours, we felt far too inspired by our fabric scraps not to use them for a project as adorable as this! We were so, so happy with our necklace and are in the process of making another one. Chains and jump rings are very cheap from websites such as ebay, and with recycled plastic you could make this necklace for barely any money at all!

View Lucie Ellen's website here
Buy 'State of Craft' by Victoria Woodcock here

Sunday, 15 April 2012

Tape Measure Rosette and Bracelet


After coveting 'How To Make Jewellery' by Tatty Devine for many weeks, we finally got our hands on a copy! But what we didn't forsee was the problem of deciding which of the incredible projects to make first! We chose to play it safe and create a tape measure rosette which, from the tutorial, only requires a punch and two split pins. You can't go wrong with that! The rosette only took ten minutes to make and we were so pleased with the result! The second item is a bracelet made from a scrap of tape measure fastened by a press stud. This bracelet (which is not from the Tatty Devine book but is an A & C idea) took even less time, with only minimal stitching involved. All that was required was to stitch the press stud on after cutting the tape to fit. To add extra detail (and cover up the stitching) you could glue on a button as we have; this really finishes the piece.

There is something so adorable about these tape measure items, especially knowing that they are simple and cheap to make. An absolute essential for any craft-lover! 

Buy the Tatty Devine book online here - https://www.tattydevine.com/shop/the-tatty-devine-book-and-tools.html
Related Posts Plugin for WordPress, Blogger...