Saturday, 1 September 2012

Back from Textile Heaven!


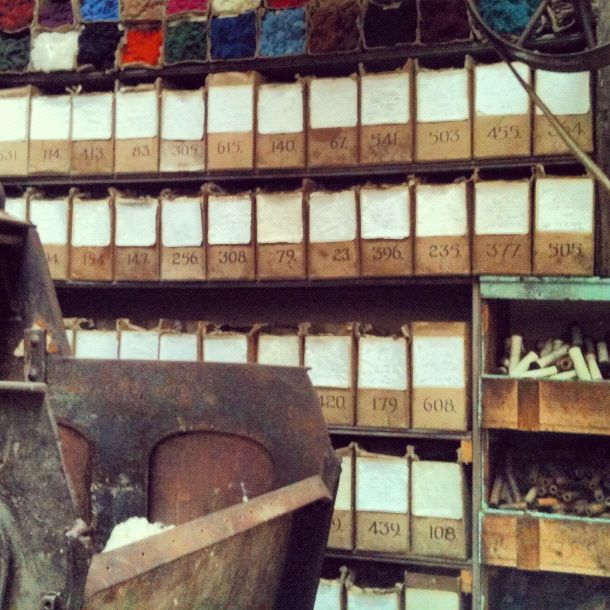
We have just returned from a very crafty holiday in beautiful Tideswell, Derbyshire where, amongst the many hours we spent on crochet, we visited the nearby fantastic Masson Mill, a wonderful working textile museum where we saw fabric being woven in front of our eyes on traditional machines! We also had a chance to view the world's largest bobbin collection which was, to us, pure heaven! We fell in love with the museum, preserved just as it was with no frills. It was completely unspoilt and filled from floor to ceiling with textile goodness! Our photos hopefully show you how fantastic it is - well worth a visit! 


Oh, and we couldn't resist buying some of the yellow fabric we saw being woven! Now... what to make with it?


Sunday, 5 August 2012

Double-sided Vintage Mother-of-Pearl Button Hanging Heart

Among other things, my grandmother left me her button box. In amongst all the 'usual suspects' was a card of beautiful, old, handmade mother-of pearl buttons. I tried to think of a fitting use for them that would also be a tribute to my grandmother's memory.....the button heart!

I decided to make the heart doublesided so that it would look good from whatever angle it could be seen from, it also had the added benefit of making it a bit more robust.

Take a length of craft or beading wire and attach your first button, leaving a short length for tying off at the end once all the buttons are threaded on.

Next, thread the wire through first one hole (from the wrong side over the front of the button) then the other, turn your second button wrong side to wrong side with your first button with the second hole of the first button lined up with the first hole of the second button and pass the wire though the holes.

Thread the wire through the second button's second hole then put your third button wrong side to wrong side with the second button lining up the holes as before. Continue in this way until you have threaded enough buttons together to bend the wires into a heart shape (I used 18 buttons for the front and 18 buttons for the back).

Once you have formed your heart shape, twist the wires together neatly and snip off any ends. Attach a pretty ribbon for hanging the heart.

I have since made several more hearts, all using different coloured wire and buttons. They make beautiful Christmas tree decorations too!

Wednesday, 1 August 2012

Going for Gold - Crochet Olympic Medals and Free Tutorial


What a day for British sport! First, a gold and bronze in the rowing, then a gold and bronze in the men's cycling time trials, then a silver in the men's 200m breaststroke! A day like this really makes us proud to be British! Inspired by our country's success, we created our very own Olympic gold, silver and bronze crochet medals so that we can join in the celebrations too, and we've even written a tutorial - aren't we good to you?

If you would like to make your own crochet medal you will need:

-3mm Crochet Hook
-Medium weight DK yarn in yellow, grey and light brown
-Red ribbon
-Black embroidery thread
-Red thread
-Pins
-Tapestry needle
-Embroidery needle

Crochet Stitches

-ch
-htr
-ss

How to make a Crochet Olympic Medal


To start, ch4 then join together with a ss to form a ring. Ch2, then stitch 10htr into the ring. Ss into the second chain of your first ch2 to form a ring. This should leave you with 11 stitches.


Ch2, then work 1htr into the first stitch, then 2htr into each of the next 10 stitches. Ss into the second chain of your first ch2 to form a ring. This should leave you with 22 stitches.


Ch2, then work 1htr into the first stitch, *1htr into the next stitch then 2htr into the next stitch*. Repeat from * to *, finishing on 1htr. Ss into the second chain of your first ch2 to form a ring.


Ch2, then work 1htr into the first stitch, *1htr into the next stitch, 1htr into the next stitch then 2htr into the next stitch*. Repeat from * to * ending on 1htr. Ss into the second chain of your first ch2 to join.


Ch2, then work 1htr into the first stitch, *1htr into the next stitch, 1htr into the next stitch, 1htr into the next stitch then 2htr into the next stitch*. Repeat from * to * ending on 1htr. Ss into the second chain of your first ch2 to join. To finish, cut yarn and pull through loop on hook to finish. Tie in ends with a tapestry needle.


Repeat instructions for all three medal colours.

To attach the ribbon, fold in half, pin onto the reverse of the medal and stitch with red thread and an embroidery needle. Embroider the numbers onto the medals with thick black embroidery thread.


We hope you like this tutorial and have fun creating medals to support the athletes or have
your very own Olympic games!


Tuesday, 31 July 2012

Folded Flower Birthday Card

I was inspired to make an extra special birthday card for an extra special friend.

Using heavy gauge watercolour paper, I cut out a nine petal simple flower shape leaving a good sized circular shape in the middle (which will help with cleaner/sharper folding later on).

Using water colours I painted the back of the flower in funky spots and, once dry, the front of the petals in gorgeous yellow tones. My message was then written across the centre of the flower before folding all the petals inwards, laying one petal on top of the next. I attached this to a card blank and also made a little 'open me' tag to add the finishing touch! So sweet.

Monday, 30 July 2012

Crochet Necklaces - a Mollie Makes tutorial


As part of Mollie Makes's Tutorial Tuesday, last week they released a tutorial by Carol Meldrum on how to crochet a necklace and we fell completely in love! Having recently learnt to crochet, we just could not resist having a go at these necklaces. We made one of each of the necklaces, the green one is the 'shell' trim necklace, made with DK yarn and the white one is the 'arch' trim necklace made with 4ply yarn and a 1.75mm hook. Instead of adding the button to link the ends as the tutorial says, we added ribbon ties which, we think, make the necklaces look even more adorable! The necklaces were really quick to make and the tutorial was brilliant. We love them! 

Beads? Wire? Ribbon?.....Necklace!!


This necklace is a firm favourite in my rather large (!) and varied collection.....ironic since it cost me almost nothing being made from old beads donated years ago by a good friend, beading wire and a ribbon scrap.

I made around 20 wire loops of around 20 beads per loop (although this would depend on your personal necklace length preference and the size if bead you wish to use) and interlinked them as I made each one. Several of the loops were made up of more than one colour too. One I had achieved the required necklace length, I sewed on a scrap of ribbon for around the back of the neck but this would also look pretty with two ribbons tied in a bow!

Fabulous Flowers!

These beautiful flower brooches are made from strips taken from an old jumper.....hard to believe, I know!

First, cut a strip approx 2cm wide x 12cm long. Fold in half lengthways with right sides together then roll from narrow end to narrow end to form the centre of the flower. Secure by pushing a threaded needle right through the roll, then finish off. The folded edge of the roll will be the right side of your flower.

To make the petals, cut another strip approx 2cm wide x 23cm long. Fold in half lengthways with right sides together. Make a loop of the strip, place over your completed flower centre and join with a couple of stitches. Then push needle right through centre and then through the centre of the loop on the opposite side effectively making two new loops around the flower centre. Push the needle through the flower centre and through the centre of first one loop then the other, effectively creating four loops. Continue in this way until you have your required number of loops/petals.

Once finished, sew a pin to the back. I also sewed a sprinkling of seed beads to the centre to add a bit of sparkle!
Related Posts Plugin for WordPress, Blogger...