Showing posts with label handmade. Show all posts

Thursday, 14 March 2013

An Adventure in Wet Felting!


Our fascination for this fantastic craft started a few years ago when A made a wonderful felt pot at school.  Never having tried wet felting, I was determined to have a go too but it took another of A’s school sessions, that resulted in a wonderful Mother’s Day present of a felted keyring, before I got around to buying the wool tops to ‘have a go’.  Unfortunately my interest that time was short lived as I just couldn’t get the felt to go right and instead of persevering I stupidly gave up.

My interest was revived this Christmas, however, by the gift of the most wonderful ‘Gillian Gladrag Bonbon Batatelle’ necklace kit.  The colours of the wool tops were amazing, the instructions clear and concise and after covering myself and half my kitchen surfaces with soap suds, managed to ‘master the art’ enough to produce a credible reproduction of the beads in the photograph on the packet!  I was very pleased with myself for having produced something that I am proud to wear.


When A came home from Uni for “Reading” week (and I use the quotation marks advisedly!) we decided on a trip up the A24 to Dorking to Gillian Gladrag’s marvellous ‘Fluffatorium’.  Oh my goodness, what a wonderful shop this is, definitely a ‘must’ to visit if you are ever in Dorking.  A and I spent a very happy time wandering through the kaleidoscope of colours, knitting wool, buttons, knitting needles, wool tops, kits, crafting accessories, deciding what to buy.  I bought the brilliant ‘Carnivalof Felting’ book and some wool tops and A invested in another of the felting kits, for herself this time, the ‘Anemone-Ome’ flower brooch kit. (The results of which can be found here)

Back home after a restorative coffee in Dorking’s Costa, A set about making her ‘Anemone’ (one thing about wet felting is that it does smell wonderful!) and I started layering up my wool tops to make ‘Simple Flat Felt’ following the instructions in ‘Carnival of Felting’.  
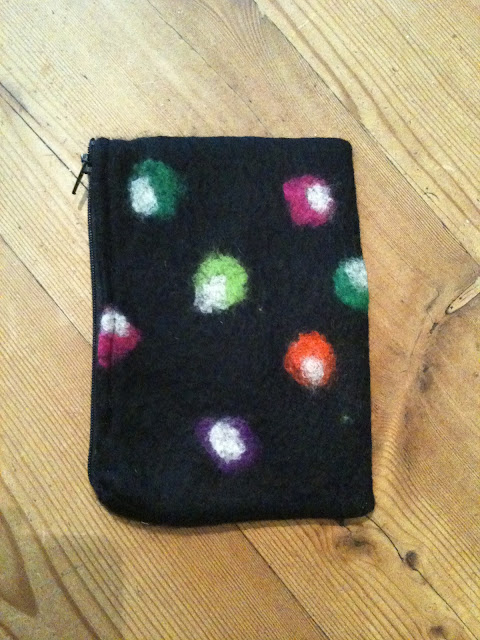
Simple and fun to do, roughly an hour or so later, damp and sudsy with slightly prune-like hands,  I had a credible rectangle of damp, black spotty felt drying naturally on the table.  Success!


Now what to do with it??  The amount of felt I had managed to make was limited by the size of the bamboo mat I had used but it turned out to be about  9” x 11” by the time it had completely done all its shrinking, plenty to make a pencil/make-up/scissors etc case.  Once it had completely dried, I found some pretty lining fabric, bought a black zip and set about transforming my felt into something useable.  Despite the best efforts of my beloved sewing machine (which was having a fitful day), I managed to make the lining and fit the zip (after a fashion) and now have a pencil/make-up/scissors case I can be proud of (just don’t look too closely at the zip fitting!)


Friday, 15 February 2013

The Best Way to Spend Valentine's Day

It's a little late now but we thought we'd report on our Valentine's day, celebrating our greatest love, crafting!

On wednesday we visited Gillian Gladrag's incredible 'Fluff-a-torium' shop in Dorking, and bought ourselves her new book 'Carnival of Felting' and her 'Anemone-Ome' corsage kit which we spent wednesday evening and yesterday morning working on. Felting the corsage was such a therapeutic process, we are completely in love! Gillian Gladrag's kits are beautiful, with such bright colours, and the instructions are so easy to follow that it becomes impossible to drag yourself away! We can't wait to visit the Fluff-a-torium again soon!


After finishing the corsage, I (A) began working on a project I'd wanted to start for a while, an cushion cover made from a tea-towel. Tea-towels are often so pretty and cheaper than metre-fabric if you are making something small like a cushion. Recently C received a Tunnock's 'Teacake tea towel' which was just too beautiful to use for it's primary purpose, so I decided to make it into a cushion. It was so simple to make, just turning over the top and bottom then sewing the sides to make an envelope back which I fixed with two bright red buttons. The teacake design is so classic and retro, I just adore it. Yesterday was definitely the most appropriate day to make it, and I've fallen in love with my valentine's cushion which will stay on display all year round! 


Lastly we were desperate to join in the 'Sheepish Heartbombing Day' hosted by One Sheepish Girl's Meredith, after we missed the last yarnbombing day she hosted last year. We wanted to bring a little love and fun to our little village so were really excited to create our hearts and display them for the public to see. I was a little less brave than C as we quickly hung our creations, photographed them then ran away however it was so much fun! We loved sharing a little bit of love in our community this Valentine's Day! 


Did you do any Valentine's Day crafting this year? 

Friday, 1 February 2013

New Year, New Skill?


 It was a funny thing really…..when ‘A’ disappeared off to Uni to study art and textiles, she obviously took ‘ supplies’ with her, including her sewing machine, fabric, her workbox, knitting needles, crochet hooks, yarn etc and amongst the various bags and boxes of creative materials went MY embroidery threads…..without even a backwards glance…..her need for them was greater than mine…..never in a million years did I think I would MISS them!  I had had them for years, toying with them for finer gauge tapestries on occasion and a couple of projects that required a little embroidery thread for a small detail.  However, once that little package of colour disappeared into the depths of Somerset, a funny thing happened -  I had a yearning to get them back…..not possible though, ‘A’ had far more use for them than I ever had, and was having much more success with them.

Up until this New Year, the extent of my ‘embroidery’ was chain stitching my initials onto my Secondary School PE kit in a rather fetching red when I was 11 years old.  Not the most successful attempt but it certainly singled out my sports kit from everyone else’s!

However, with the arrival of this New Year, I decided I needed to embrace a new skill…..now was the time for embroidery…..however, the required threads were not among the car boot full of boxes and bags that came home with A from Uni for the holidays.  There was nothing for it, a New Year’s Day trip to our newly opened (Hurrah!!) Hobbycraft was called for.

Embroidery hoop and shiny package of colour in hand, I headed for home with joy in my heart!  At the earliest opportunity, I stretched some linen in my hoop, threaded my needle and away I went.  I am sorry to say that my first attempt was not earth shattering and I was a little disappointed with my finished piece, it felt a bit meek and constrained but the most important thing I learnt from it was that I had thoroughly enjoyed doing it!  Loved it, in fact.  Couldn’t wait to get started on the next one…..which I did the very next evening, with slightly better success.  I was much bolder in my design, stitching letters freehand in colours much truer to my heart.  I even taught myself French knots – something my mother had lead me to believe were impossible when I was growing up!  I make no apology for including rather a lot in my second piece!


Since then, I have spent every available evening with a needle and gloriously coloured thread in my hand…..is there such an organisation as Embroiderers Anonymous??  I think I am an addict.


Friday, 18 January 2013

Snowed In - An Excuse For Tea and Crochet... Oh and a Granny Stripe Cowl

It's snowing! I (A) am usually a bit of a misery when it comes to snow. It seems to never be enough to close school or work, but enough to make your journey to such places an absolute pain! However, since moving from the south east to the south west, I've noticed that nothing is done by halves here, especially not the weather! Both of Bath's Universities are closed, as are most of the schools and the hills (which are pretty much the whole city) are completely impassable. However, all is not lost! I have been begging for a free day, to sit around, doing crochet and drinking as much tea as possible and I have finally been given one! I have no less than four projects that I want to continue with or begin today and I am so excited.


My view from my flat in Bath


And C's view at home in Sussex

 I have been wanting to share this project with you for a little while now but today seemed like the perfect time to do it. Over Christmas I began to make a granny stripe cowl, inspired by one I'd seen on the wonderful Coco Rose Diaries Blog. I have an obsession with burgundy and navy blue, so it seemed only natural to work my cowl in these colours. It only took me a little while to make, although I did have to work around uni work so it took a little longer than I would have liked. I love the look of granny squares but had never tried a granny stripe. Although it's the same principle, it takes a little while to get your head around the starting two or three rows but after that, it's easy and quick to make. Although tying in the ends is a bit of a chore, the final effect makes up for it.


I really enjoyed making my granny stripe cowl and am definitely making use of it today when I have to brave the snow! 

What are your crafty plans for the snow day? 

Sunday, 9 December 2012

1000th View! Merry Christmas from A&C!


It's a celebration here at SewHappy Stitchery! Today we hit our 1000th view after starting our happy little blog in May and we are so thankful to everyone who reads and (hopefully!) enjoys our crafting stories! Thank you so much!

And Merry Christmas from Bobby Robin, our little crochet buddy! He's been hanging around here for the last few days and has been bringing us so much festive cheer! We look forward to far more christmas crafts in the next few weeks! Merry Christmas!

Monday, 19 November 2012

Fabric Campbell's Soup Can


Recently I began another project for Uni, making a container using unconventional materials. Stuck for ideas, I bought the December issue of Vogue which included a jewellery feature inspired by pop-art. The jewellery was displayed on plasticine replicas of Campbell's soup cans. I loved how the iconic soup cans had been re-invented and wanted to do something similar for my container. I used pastel colours and hand-embroidered the decoration to make the can more feminine and therefore contrast with the original. I really like the use of unconventional materials, using fabric to create the can. I think the re-invention of something classic can be really exciting!

I really love my can and am so happy about the result!

Tuesday, 13 November 2012

Another Sketchbook


As the second part of the sketchbook project, we were asked to create an 'artist's book' for display, so I created a mini version of my initial sketchbook  using brown paper, carrier bags, envelopes, tissue paper and wallpaper. I like how this sketchbook is pocket-size! It's adorable!

Sunday, 11 November 2012

Life Lately - A Handmade Sketchbook

I am a little over six weeks into my BA Hons Creative Arts (Art/Mixed Media Textiles) degree course at Bath Spa University and wanted to share with you the first of my projects for the textiles half. This was to create a sketchbook from recycled paper and unusual materials such as paper bags and envelopes. I loved this project, and really enjoy working in my new book. I hope you like it too!


The pages are made from carrier bags, amazon packaging, envelopes, tissue paper and wrapping paper.


I decorated some of the pages with paper-doily stencils and made others from old book pages.


I worked from the exhibits in the Bath Fashion Museum, inspired by this vintage postcard. 


I have been experimenting with knitting carrier bags and weaving.

I love my book and can't wait to keep working in it! 
Has anyone else experimented with books?

Crazy Button Necklace!

Materials:
Neutral fabric, buttons, length of 1cm width ribbon, a few beads

This necklace was inspired by the wonderful collection of ‘odds and sods’ of buttons I have acquired over the years and didn’t want to lose in the depths of my button box…..coupled with the wonderful gift of some gorgeous buttons from my lovely daughter!

First, I cut out two identical pieces of some neutral coloured fabric in a loose ‘v’ shape and sewed them together leaving a small gap for turning right side out.

After turning right side out, I ironed the fabric paying particular attention to the seams and neatly oversewed the gap. Then came the fun bit. I sorted through my copious button collection, vintage and new, large, medium and very small and selected my favourites, laying them side by side and as closely to each other as possible to make sure I had enough to completely cover the fabric. Once I was satisfied, I sewed them on one by on.

I then then finished off the necklace by sewing a length of ribbon to the top of each side of the ‘v’ with a few neutral wooden beads threaded and knotted on for good measure. I love it!

Beautiful Curled/Wound Ribbon Necklace

Materials:
Ribbons (any!), fabric glue, couple of beads

These were made after being inspired by a wonderful blog post by Dom Norris but I have made one or two adjustments of my own (mainly using fabric glue rather than double-sided tape). The beauty of these necklaces is that they can be made from any length, colour or width of ribbon which, when glued together, can create gorgeous different effects.

Firstly, decide on the arrangement of your ribbon beads, the number you require for your necklace and the diameter you would like them to be. Then, find some different diameter objects to wind the ribbon around (I used a screwdriver shaft, a pencil and a chopstick!) to create different sized holes in the middle of the beads.

Cut a decent length of ribbon (to give you an idea, I used around 2m for the largest of my ‘beads’ which is roughly 3.5cm in diameter but this also has a tiny hole in the middle – if you have a larger hole then less ribbon is required) and neaten the ends so that they don’t fray – this can be done really easily in the case of synthetic ribbon by quickly running the cut end through a flame which melts the fabric neatly and seals it at the same time.

Then place a line of glue along the cut end of ribbon and roll around the object you have chosen to make the hole. Once this is secure, run a thin line of glue down the middle along the length of the ribbon (I tend to do this a little at a time rather than the whole length as it can get very messy!) and firmly roll the ribbon round and round until the whole length is of ribbon is used up and slip off your pencil/chopstick and leave to dry. Repeat this step until you have made all the beads you need.

Place the beads in the arrangement you would like for your necklace and carefully glue them together where they touch each other only. One you have done this, leave to dry thoroughly before attaching the ribbon tie. I cut a couple of long lengths of very thin (4mm ribbon) and threaded through the top ribbon beads. I secured them with a knot and then threaded a couple of beads on to finish the whole thing off – lovely!

Saturday, 1 September 2012

Back from Textile Heaven!


We have just returned from a very crafty holiday in beautiful Tideswell, Derbyshire where, amongst the many hours we spent on crochet, we visited the nearby fantastic Masson Mill, a wonderful working textile museum where we saw fabric being woven in front of our eyes on traditional machines! We also had a chance to view the world's largest bobbin collection which was, to us, pure heaven! We fell in love with the museum, preserved just as it was with no frills. It was completely unspoilt and filled from floor to ceiling with textile goodness! Our photos hopefully show you how fantastic it is - well worth a visit! 


Oh, and we couldn't resist buying some of the yellow fabric we saw being woven! Now... what to make with it?


Related Posts Plugin for WordPress, Blogger...